
Master’s Surgical Technique
Closed Reduction of Developmental Dislocation of the Hip with Application of a Waterproof Cast
1NYU Langone Health, Department of Orthopedic Surgery, New York, NY; 2Division of Orthopaedic Surgery, Children’s Hospital of Philadelphia. Perelman School of Medicine at the University of Pennsylvania, Philadelphia, PA
Correspondence: Christina Herrero, MD, NYU Langone Health, Department of Orthopedic Surgery, 301 East 17th St., 14th Floor, New York, NY 10010. E-mail: [email protected]
Received: January 16, 2023; Accepted: April 17, 2023; Published: May 1, 2023
Volume 5, Number 2, May 2023
Abstract
Developmental dysplasia of the hip (DDH) is a common orthopaedic condition in infants with an incidence of 1 in 1000 infants. An ultrasound can be performed at 6 weeks if the infant exhibits any risk factors, either intrauterine or at birth. If an ultrasound is positive for DDH, treatment typically begins with a dynamic brace such as the Pavlik harness. If bracing is unsuccessful or the infant presents at an age deemed too late to start brace treatment, closed reduction should be considered. Typically, this is done under anesthesia holding the infant in the so-called human position and maintaining this for at least three months. One of the significant challenges of casting after a closed reduction is maintaining hygiene for the entire 3 months of treatment. This paper presents a detailed surgical technique guide to help physicians with closed reduction, casting with waterproof material, and advanced perioperative imaging to confirm reduction.
Key Concepts
- Developmental dysplasia of the hip (DDH) is a common orthopaedic condition in infants with an incidence of 1 in 1000 infants.
- The standard intervention after Pavlik harness or abduction bracing is closed reduction and casting.
- Waterproof casting addresses the significant challenge of maintaining hygiene for the full 3 months of treatment after closed reduction and casting for DDH.
- Confirmation of closed reduction can be achieved with arthrogram or advanced imaging such as 3D CT.
Introduction
Since developmental dysplasia of the hip (DDH) continues to be a common orthopaedic condition of newborns, there is abundant literature and guidelines on detecting as many cases as possible and instituting consistent treatment protocols to prevent additional femoral and acetabular pathology later in life.1 In 2015 and 2016, the Journal of the American Academy of Orthopaedic Surgeons (JAAOS) published guidelines for initial detection, nonoperative management, and subsequent surgical management of DDH.2,3 Ideally, all cases would be detected at birth, dynamic bracing implemented, and the impact of DDH would be lessened.
Typically, closed reduction and casting are the next steps for children presenting after 6 months to 12 months of age or when bracing has been unsuccessful. There is some variation in the technique, and the reported success rates range from 57 to 94%.4 This disparity emphasizes the importance of understanding the correct patient indications, technique, use of advanced imaging, and follow-up.
Similarly to the AAOS guidelines, we do not recommend pre-reduction skin traction before closed reduction. We recommend performing the reduction in the OR under general anesthesia to maximize relaxation and chances of a successful closed reduction. The addition of an adductor tenotomy should be made at the surgeon’s discretion, depending on the physical exam and position of maximal stability of the reduced hip. Once the reduction maneuver of flexion, abduction, and gentle traction is performed, one can confirm reduction with an arthrogram or advanced imaging after cast application. Some clinicians that treat a high volume of patients find performing an arthrogram unnecessary when there is a clear tactile sensation of reduction, and the hip can be held safely in that position. After placing a hip spica cast, these clinicians perform advanced imaging in the operating room to confirm reduction before the patient wakes up (our preferred technique). For other clinicians, an arthrogram may be performed, and ample literature is available on correctly performing and evaluating the reduction with the arthrography under fluoroscopy.5–7 These patients still required advanced imaging to confirm reduction after cast application.
The advanced imaging performed post-casting can be CT, MRI, or, most recently, gadolinium contrast-enhanced imaging, which also assesses the perfusion of the femoral ossific nucleus, helping to predict the possibility of subsequent osteonecrosis.8 Once concentric closed reduction of the hip is confirmed, the most challenging part for the family begins—maintenance of hygiene for the hip spica cast. Comfort is crucial as the patient is placed in a cast for 3 months, typically with a cast change at 6 weeks. Not only is diaper change an obstacle but also bathing and preventing the cast from getting soaked. We converted our supplies to a waterproof liner and padding material and have significantly improved cast care, compliance, and family feedback. We allow bathing and even safe and supported submerging of the cast in warm soapy water followed by rinsing with a mobile showerhead, as this keeps the skin clean and fresh. As cast compliance is critical to the success of the closed reduction and casting, we highly recommend using our technique with these specific materials.
This paper presents a detailed surgical technique guide to help physicians with closed reduction, casting with waterproof material, and advanced perioperative imaging to confirm reduction.
DESCRIPTION OF METHODS
The closed reduction of a dislocated hip should be performed in the operating room under general anesthesia. A dedicated hip spica casting table should be used. Waterproof under-wrap and fiberglass immobilization casting tape are easily accessible to the surgeon and their two assistants. Additionally, we recommend having cross-sectional imaging in the room to facilitate confirmation of reduction before leaving the operating room, in those centers that do not have intraoperative CT or MRI scanners one can get a CT scan after leaving the recovery room as the cast will hold the infant still for the short duration of the scan.
Exam Under Anesthesia
The first part of the procedure is to perform an exam under anesthesia while the baby is relaxed. By flexing and adducting both hips, a Galeazzi sign will become apparent. The child’s right knee sits lower than the left. Next, by placing the plantar surfaces of the baby’s feet together, asymmetric abduction is apparent.
Closed Reduction
By abducting and levering the femoral head into the joint with gentle pressure, we reproduce the Ortolani maneuver, and closed reduction is achieved. The hip is placed in 90 degrees of hip flexion and between 30 to 40 degrees of abduction (Figures 1–3). At this point, the so-called safe zone should be evaluated, and the hip should be stable without requiring more than 45 degrees of abduction. An adductor tenotomy should be considered if this safe zone is too small. Hips tend to be stable in wide abduction; we consider a safe zone to be ample when the hip is reduced and is stable in 90 degrees of flexion and can be carried into 30 degrees of abduction before dislocating. If the hip dislocates with less abduction, we perform an adductor tenotomy. Similarly, a psoas tenotomy should be considered if the hip is unstable in less than 80 degrees of flexion or unstable in extension beyond 90 degrees of flexion.9 On the contrary, if the safe zone is ample, one can proceed with closed reduction and casting and avoid the tenotomies.
Figure 1. Clinical image of casting for closed reduction. The hips are flexed to 90 degrees.
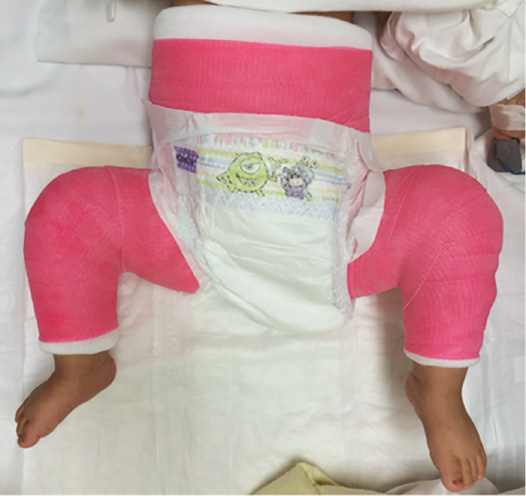
Figure 2. Clinical image of casting for closed reduction. Hip abduction is slightly less on the treated hip. Trochanteric mold is evident.
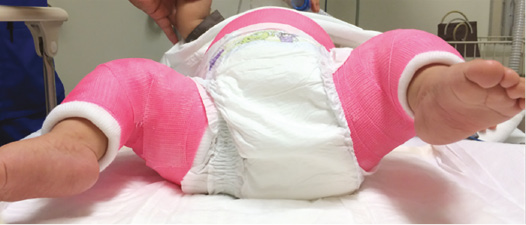
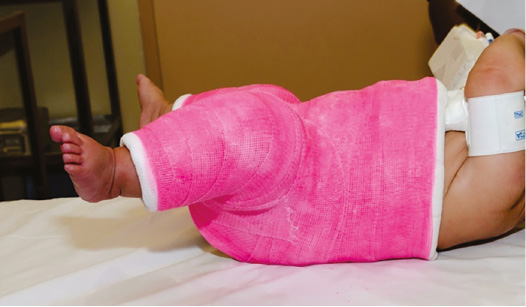
Figure 3. Clinical image of casting for closed reduction. The cast extends to the chest and ends at the ankles for both the affected and unaffected hips.
Waterproof Wrapping and Casting
First, a Gore-Tex liner (AquaCast Protective Hipster Liner, Medline, Northfield, IL) is placed, which is beneficial for maintaining good hygiene. We use a Spica table that is well-padded. The baby is placed onto the Spica table, which supports the shoulders and the sacrum while ensuring that the chest is free for casting. Two small towels should be temporarily placed on the abdomen to ensure room for breathing and feeding in the cast once they are removed.
Cast application requires the collaboration of three people, one to hold, one to cast, and one to be able to evaluate all sides of the cast to ensure the skin is free. It is crucial to hold the foot without occupying too much space to avoid blocking the area for the person casting. Holding the foot with two fingers above the ankle and the thumb in the sole is easiest. This technique allows the person holding to be entirely out of the space of the person casting while maintaining the human position, which is 90 degrees of hip flexion. The person holding should also be as close as possible to the baby since the tendency will be to relax and extend the hips. They should also be in approximately 30 to 45 degrees of abduction according to that pre-determined safe zone and in neutral rotation.
One can then begin to roll the waterproof cast padding made of polyethylene. The first roll should be used for the abdomen only. Then a 2-inch roll is used to go down the leg to the ankle level to just above the malleoli.
Both legs will be included to above the ankle in the cast even if dealing with a unilateral dislocation. Once the waterproof cast padding has been applied to both extremities, ensure the person holding it is comfortable and verify the position of the extremities.
Once again, we begin at the torso, wrapping just below the level of the nipples, using a 3-inch roll. One can then fold the Gore-Tex liner to create a nice, rounded edge. Keep the towels in until the end to maintain the extra room.
The art of placing a hip spica is crossing the actual hip joint. One must verify the reduction again. Then a 2-inch roll is begun at the level of the umbilicus. The cast material is passed over the hip joint while holding it with the index finger and then coming up and around the belly, creating a crisscross or spike pattern like wheat sheaths. The third assistant can help to hold this corner down as it does tend to lift.
The strength of the Spica cast does not come from the thickness of the layers but rather from the width between the groin and the gluteus. This part is the spica itself—this figure of 8 creates the fundamental struts of the casts, ensuring it holds its shape and therefore holds the hip reduced. One should be able to achieve at least three passes for each hip. After the cast has been passed three times around the hip, one can continue down the extremity using another roll of 2-inch cast material. Once the cast has been applied to the level of the malleoli, it is imperative from a technical standpoint to apply a trochanteric mold. The mold should be applied with the left hand for the right hip and the right hand for the left hip, with the surgeon standing at the patient’s shoulder. Here, one can observe how gentle pressure under the greater trochanter is produced while keeping the knee in 90 degrees of flexion with the left hand. Care is taken to avoid digging into the popliteal space. A gentle pressure is applied and molded to hold the hip in this position of maximal stability.
We prefer to begin with the affected/more unstable side. Only after that cast has been completed, the other side is casted in the same position using the same technique of going above the belly and below the thigh in successive turns, creating the spica struts. Some gentle molding can be done for symmetry, but pressure points should never be created. It is essential to ensure enough space for a diaper and hygiene.
One should then finalize the cast by folding the Gore-Tex liner at each edge and once again verifying the position with the foot pointing forward and the hips held in the so-called human position. A final fiberglass roll can then be placed to hold the Gore-Tex and strengthen the overall cast.
Confirmation of Closed Reduction with Advanced Imaging
Once the cast has hardened, the patient is taken off the Spica table and placed on a regular radiolucent table. We prefer to use 3-D intraoperative CT to confirm reduction. Cross-sectional imaging to evaluate the reduction is crucial and is done before waking the child. If a successful reduction is not observed, the cast is removed, and the procedure is repeated. If cross-sectional imaging or sedation is unavailable, radiographs followed by MRI are an acceptable alternative. Bachy et al. confirmed 30 out of 36 successful closed reductions using this technique. In this cohort of 36 hips, only three dislocations were not identified on plain radiographs and were discovered on MRI. The remaining three dislocated hips were suspected on radiographs and confirmed on MRI.10 However, previous literature has demonstrated that 3D-cross-sectional imaging is more reliable in measuring reduction parameters than plain radiographs.11 If no intraoperative imaging is available, the reduction can be evaluated by a physical exam and detecting fullness in the inguinal region; however, this method is inaccurate.12
Use of 3-D Intraoperative CT
The only images needed are those demonstrating the position of the proximal femoral epiphysis about the triradiate cartilage; these are the most objective measures of quality in the reduction. Literature supports that CT is a reliable method to confirm reduction. The posterior neckline is a reliable method to confirm the adequacy of hip relocation on post-reduction axial CT cuts.13 This is a line drawn along the posterior aspect of the femoral neck going from the metaphysis towards the epiphysis and it should point anteriorly to the ischium on the axial imaging. Additional, however, less reliable parameters to confirm relocation include modified Shenton’s line and femoral head coverage on coronal CT cuts.13 Femoral head coverage of less than 30% has shown to be a prognostic factor for late acetabular dysplasia.12 Therefore, anything less than 30% may deem an unsuccessful reduction. Our preferred parameter is looking at the position of the proximal femoral epiphysis being in contact with the triradiate cartilage (Figures 4–6).
Figure 4. Axial CT demonstrates the ossific nucleus and the epiphysis in contact with the triradiate cartilage. The originally dislocated right hip appears slightly posterior and is a common finding.
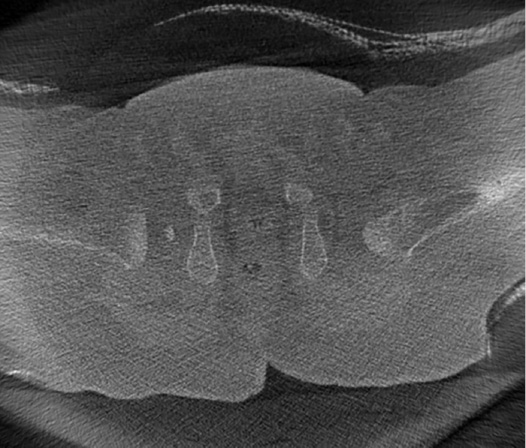
Figure 5. Coronal CT cut confirming contact between the epiphysis and triradiate cartilage.
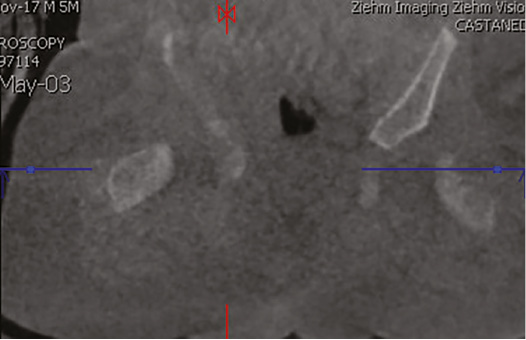
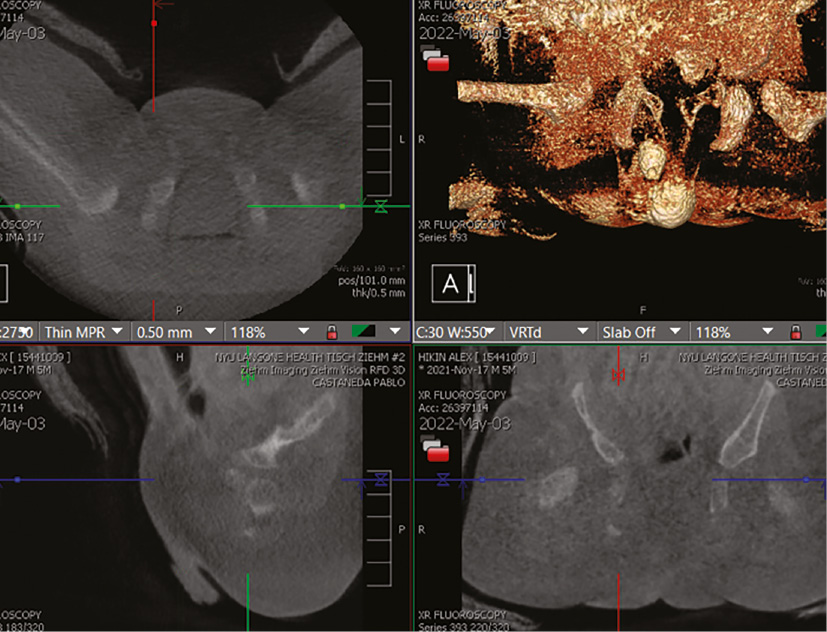
Figure 6. All three slices: axial, coronal, and sagittal, and the 3D reconstruction post-reduction.
If an Appropriate Reduction Cannot Be Achieved
The procedure is repeated if an appropriate closed reduction cannot be achieved based on the geometric parameters on either CT or arthrogram. Depending on the patient’s age, the subsequent treatment step would be an open reduction if one cannot achieve an adequate reduction.
Postoperative Protocol
A cast change is performed at 6 weeks under anesthesia. After the cast is removed, the patient is transitioned to an abduction brace for up to 3 more months when a concentric reduction is achieved. The position required for the closed reduction should be maintained for 3 months. Although we continue to perform the cast change under anesthesia, there should be a consideration to maintaining the same cast for the entire 3 months, especially since hygiene is much improved using waterproof materials. One study of 113 hips undergoing closed reduction and casting for 3 months, followed by abduction bracing for 6 weeks, demonstrated satisfactory results with a resolution of dysplasia in 90% of hips.9 We do not find physical therapy required for movement or ambulation afterward.
COMPARISON TO OTHER METHODS
Use of Arthrogram
Some surgeons perform an arthrogram to assess reduction and to look for blocks to reduction before placing the spica cast. To perform an arthrogram, a 20-gauge spinal needle is inserted below the adductor longus tendon aimed toward the ipsilateral shoulder, angled approximately 30 degrees downward. The image intensifier is used to localize and confirm needle position. The needle can be twisted, backed out slightly, or repositioned under the image intensifier if resistance is felt. After feeling a slight “pop” as the needle penetrates the hip capsule, <1 mL of saline is injected to ensure easy flow. Once easy flow is achieved, arthrogram dye is injected via intravenous tubing under live fluoroscopy. Enough dye should be injected to allow adequate visualization (typically 2-3 mL), but too much dye can create a tamponade effect which may contribute to the risk of AVN. Immediate shots or live imaging upon injection help confirm that the dye is within the joint before so much errant contrast gets injected that visualization becomes obscured.
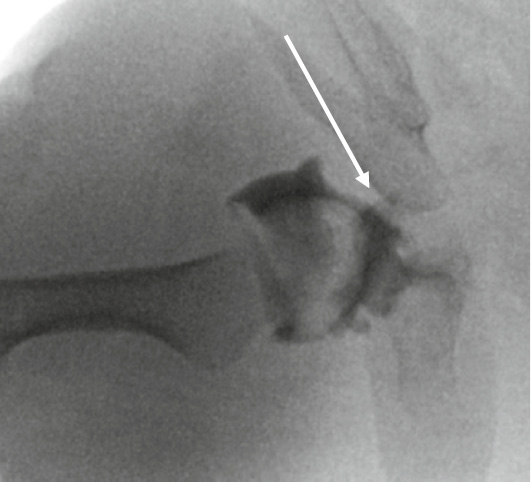
The quality of hip reduction should now be assessed based on the arthrogram. Ideally, the femoral head will be well-medialized with just a thin rim of medial dye visible. A sharp corner of the chondrolabral complex should be seen laterally (the so-called “rose thorn”), and the bony and cartilaginous acetabulum should contain the femoral head (Figure 7). Poor coverage, an infolded labrum, or a “large” medial dye pool indicate an imperfect reduction, which necessitates open reduction (Figures 8 and 9). What constitutes an unacceptable medial dye pool has been investigated previously, with reports suggesting that 4-7 mm may be the upper limit.5 However, there is no straightforward way for a surgeon to measure the dye pool intraoperatively, as discrete measurements are not easily applied to fluoroscopic images subject to magnification errors. A subsequent study corroborated the use of arthrography by comparing images to immediate postoperative MRI; the authors suggested that a medial dye pool ≤16% of femoral head width was a more useful intraoperative criterion for determining the adequacy of closed reduction.
Figure 7. A sharp corner of the chondrolabral complex should be seen laterally (the so-called “rose thorn”), and the bony and cartilaginous acetabulum contains the femoral head well.
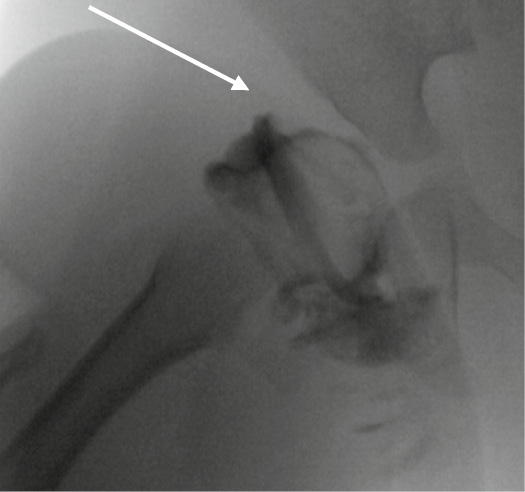
Figure 8. Arthrogram with obstructive limbus.
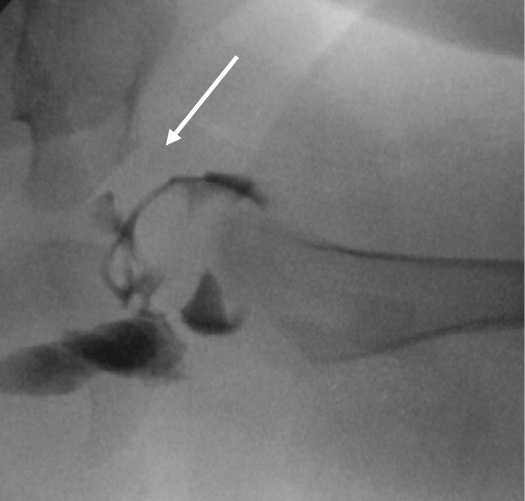
Figure 9. Arthrogram with wide medial dye pool.
Summary
The goal of closed reduction is to provide a stable reduction to promote congruent, coupled motion between the proximal femur and the acetabulum. Closed reduction and casting can be life-altering for patients, helping them avoid future surgical interventions and degenerative changes. We believe the waterproof cast is just as “secure” as a traditional cast, but as with all new materials, it takes some time to get used to it. Once one develops expertise in applying it, it is just as effective and can be molded, equivalent to traditional casting. Since switching in 2018 to waterproof casts, our results have been the same as with traditional or non-waterproof casts. Although this is not yet published, we have a 2% rate of re-dislocation. With the introduction of waterproof lining and casting coupled with advanced imaging in the operating room, we have improved the coordination, feasibility, and consistency of this intervention. We are certain that this technique guide can help others do the same.
Additional Links
- American Academy of Orthopaedic Surgeons (AAOS) Orthopaedic Video Theatre, Closed Reduction of Developmental Dislocation of the Hip with Application of a Waterproof Cast
- POSNAcademy, DDH: Non-Surgical Management
- POSNA/IHDI, Infantile DDH
Disclaimer
The authors have no conflicts of interest to report related to this manuscript.
References
- Home - International Hip Dysplasia Institute. International Hip Dysplasia Institute. https://hipdysplasia.org/. January 14, 2021.
- Mulpuri K, Song K, Goldberg MJ, et al. Detection and nonoperative management of pediatric developmental dysplasia of the hip in infants up to six months of age. J Am Acad Orthop Surg. 2015;23(3):202-205.
- Murphy RF, Kim YJ. Surgical management of pediatric developmental dysplasia of the hip. J Am Acad Orthop Surg. 2016;24(9):615-624.
- Cha SM, Shin HD, Shin BK. Long-term results of closed reduction for developmental dislocation of the hip in children of walking age under eighteen months old. Int Orthop. 2018;42(1):175-182.
- Race C, Herring JA. Congenital dislocation of the hip: an evaluation of closed reduction. J Pediatr Orthop. 1983;3(2):166-172.
- Renshaw TS. Inadequate reduction of congenital dislocation of the hip. J Bone Joint Surg Am. 1981;63(7):1114-1121.
- Severin E. Arthrography in congenital dislocation of the hip. J Bone Joint Surg (Am). 1939;21(2):304-313.
- Tiderius C, Jaramillo D, Connolly S, et al. Post-closed reduction perfusion magnetic resonance imaging as a predictor of avascular necrosis in developmental hip dysplasia: a preliminary report. J Pediatr Orthop. 2009;29(1):14-20.
- Tennant SJ, Eastwood DM, Calder P, et al. A protocol for the use of closed reduction in children with developmental dysplasia of the hip incorporating open psoas and adductor releases and a short-leg cast. Bone Joint J. 2016;98-B(11):1548-1553.
- Bachy M, Thevenin-Lemoine C, Rogier A, et al. Utility of magnetic resonance imaging (MRI) after closed reduction of developmental dysplasia of the hip. J Child Orthop. 2012;6(1):13-20.
- Drummond DS, O’Donnell J, Breed A, et al. Arthrography in the evaluation of congenital dislocation of the hip. Clin Orthop Relat Res. 1989;(243):148-156.
- Zhang Z-L, Fu Z, Yang J-P, et al. Intraoperative arthrogram predicts residual dysplasia after successful closed reduction of DDH. Orthop Surg. 2016;8:338-344.
- Khaled LE, Hesham TK, Amin AR, et al. Reliability of the computed tomography criteria after closed reduction of developmental dislocation of the hip. Pediatr Traumatol Ortho Reconstr Surg. 2022;10(3):235-245.